Sunday, 3 November 2019

Castle battlement dimensions

Index: Common measurements: Castle battlement dimensions

Castle battlement dimensions

Some terminology first:
  • Parapet: The battlement wall.
  • Crenels: The nothces in the parapet offering firing positions for the defenders.
  • Merlons: The blocks between the crenels, protecting the defenders from incoming fire.

RL 133% 150% 200%
Crenel width
Min. 0.6 0.8 0.9 1.2
Max 0.9 1.2 1.4 1.8
Merlon width
Min. 1.2 1.6 1.8 2.4
Max. 1.5 2 2.3 3
Merlon height
Min. 0.9 1.2 1.4 1.8
Max. 2.1 2.8 3.2 4.2

Source

designingbuildings.co.uk

Tuesday, 29 October 2019

Common tin can sizes

Common tin can sizes

All measurements are in cm.

Metric


Diam Height Typical use
250 ml ? ?
300 ml 8.5 5.5 Corn, Mushrooms (mini boxes)
500 ml 7.5 11 Tomatos, Beans
750 ml ? ?
900 ml 10 12 Stew, , Soups, Meat balls
1 l ? ?

U.S.


Diam Height Typical use
6Z 5.48.9
8Z Short 6.87.6
8Z Tall 6.88.3
No. I (Picnic) 6.810.2
No. 211 Cylinder 6.812.4
No. 300 7.611.3Cranberry Sauce. Pork & Beans
No. 300 Cylinder 7.614.1
No. I Tall 7.811.9
No. 303 8.111.1Fruits. Vegetables. Soups
No. 303 Cylinder 7.614.1
No. 2 Vacuum 8.78.6
No. 2 8.711.6Juices. Soups. Vegetables
Jumbo 8.7314.3
No. 2 Cylinder 8.713.7
No. 1.25 10.36
No. 2.5 10.311.9Fruits. Vegetables
No. 3 Vacuum 10.88.7
No. 3 Cylinder 10.817.8
No. 5 10.514.3Fruit Juice. Soups
No. 10 15.717.8Fruits. Vegetables

Sources

  • Metric dimensions: My own measurements (more info needed here)
  • U.S. dimensions: Wikipedia

Common container sizes

Index: Common measurement: Common container sizes

Common container sizes

Wednesday, 25 September 2019

AO animation settings

Index: Assets: Animations

AO animation settings


Recommended settings for AO animations:

Type Priority Looped Duration Comments
AO Run 3 y 20 sec
AO Walk 3 y 20 sec
AO Stand 1 or 2 y 20 sec
AO Left turn 3 or 4 y
Priority is messed up here. To fully override the default, it must be a 4. You can use a 3, but there will be issues.
AO Right turn 3 or 4 y
Priority is messed up here. To fully override the default, it must be a 4. You can use a 3, but there will be issues.
AO Crouch 3 or 4 Depends

AO Crouchwalk 3 y

AO Prejump 3 or 4 n 1-2 sec
AO Jump 3 or 4 Depends generally 2-3 sec
AO Landing 3 or 4 y generally 2 sec
AO Hard Landing 3 or 4 n generally 3 sec
AO Stand up 3 or 4 n

AO Fly Up 3 or 4 y

AO Fly Left turn 3 or 4 y

AO Fly Right turn 3 or 4 y

AO Fly 3 or 4 y

AO Fly Slow 3 or 4 y

AO Fly Down 3 or 4 y

AO Falling 3 or 4 y

AO Sitting 3 y

AO Sitgrounds 3 y

AO Swimming 3 y

AO Swim up 3 y

AO Swim down 3 y

AO Swim Left turn y


AO Swim Right turns 3 y

AO Typing 3 y

AO Away 3 y

AO Busy 3 y


Sources

Tuesday, 24 September 2019

Creating LoD models, case study 1

Tutorials: Creating LoD models, case study 1

Creating LoD models

Case study 1: Bent tube

This is based on a question at the official Second Life forum. The OP was trying to make a shackle for a padlock, simply a bent cylinder, and although the question wsn't about LoD, the shape is such a great example of the most basic principles of LoD optimisation so I thoguht I'd post an extended version of my reply here.

First, lets look at the high model. Here it is with a generous 24 curve resolution (curve resolution numbers are always for the full circle btw so the bend only has 12 segment since it's just half a circle):


That gives it a triangle count of 672 which is way too high for a simple object like this. Let's try to delete every other edge loop to get the curve resolution down to 12:


Woops! That didn't work too well. The profile of the cylinder is fine - it's possible we could reduce that even more - but the bend is way too edgy. Solution? You guessed it: reduce the curve resolution for the profile only and keep the bend as it is:


That's more like it!

Before we go on getting rid of triangles, we should look at the normals. They need to be smooth. If they aren't already, change it here:


Smooth normals are essential for curved surfaces. What they do, is adjust the shaders so joined surfaces at different angles blend into each other.

With flat normals, the cylinder would have looked like this even with 24 curve resolution:


 With smooth normal we get this with only 12 curve resolution around the profile:


That's more like it, and this is with only half the triangles we started with!

Now, for the medium LoD model. This is so simple anybody who can handle a 3D modelling program at all can do it. Just remove edge loops to reduce curve resolution. Most people would probably remove every other loop here but we can actually take it further. Remove two out of three loops around the cylinder circumeference and every other loop around the bend:


Yes, it looks dodgy on closeup but this model si only seen at a distance. I promise you it will be fine. Note that I made the not-a-cylinder-anymore profile diamond shaped with edges rather than faces pointing along the axises. This is partly so that I don't have to mess around with the edge loop that is a seam but mostly because this tends to give a more credible circular look. Try both options and you'll see.

For the low model, let's go for a triangular circumference and curve resolution 8 around the bend:


This means we'll have to reposition some edge loops a bit to keep the volume of the cylinder but it's not that much work and it's sooo worth it when it means we can get a LoD model that looks perfectly fine with only 36 triangles. Here are the low and high models superimposed onto each other so you can see how their profiles fit:


Now for the lowest LoD model and an important thing to remember:

It's not always the high LoD model that is the main one!!!

In fact, it usually isn't. The main model is the one people usually see and which one that is, depends on the object's size. In this case, it's the lowest LoD model.

Fortunately this padlock shackle is so small you'll never see much details at any realistic view distance anyway so we can keep it very simple: triangular profile, square bend:


That gives us 18 triangles and 12 vertices and there's hardly any point going further than that.

But if you still want to reduce more, you can get it down to only 12 triangles by removing the inner faces:


Seen from below(ish):


And that's it.Triangle counts: 336, 64, 36 and 18 respectively.

For comparasion, the uploader wants to use 336, 82, 20 and 10 triangles for the LoD models of this item but the result it produces with those values is absolutely horrible. To get a decent look from the uplaoder's auto-generated LoD models, you have to increase the triangle counts to  336, 167, 82 and 82 that's a lot of wasted land impact and lag.

Monday, 6 May 2019

Road and Street dimensions

Index: Common measurements: Landscaping: Roads and Streets

Road and Street dimensions


Road width

4-6 m per lane is fairly reasonable.


Cobblestones

A cobble is defined on the Udden-Wentworth scale as a stone with a particle size of 64-256 mm and a genuine cobblestone road surface will be made of natural stones of varying size but approcimately within that range - perhaps mainly in the medium-to-small range.

What we usually call cobblestones today are strictly speaking "setts" or "Belgian blocks", cut stones of equal size. Typical dimension for a sett is about 10 cm. taking into account the space between them, expcet 8-9 stones per meter.

Wednesday, 1 May 2019

System Vegetation

Index: Assets: System Vegetation

System vegetation

System vegetation (aka "Linden plants") is an old feature for creating vegetation. It was introduced to Second Life by Linden Lab early in 2008 and seems to have been inspired by SpeedTree. It was a bit of a rush job though and it has never been updated so they are quite limited. They do have their uses though and some builders have done some remarkably good creative work with them.


System trees and grass

There are two different kinds of System vegetation, "System trees" and "System grass". Both names are rather misleading since they can be used for quite a bit more:
  • A "system tree" is a single relatively elaborate plant. In addition to trees, the feature is also used for bushes, ferns and grass clumps.
  • A "system grass" is made from 32 single sheets spread across an area. In addition to grass, the feature is also used for undergrowth shrubbery.


Limitations

  • System vegetation is limited to the old 10 m max size, so no tall trees.
  • System grass automatically aligns with the system ground. This can be an advantage but it also means it doesn't work on sky platforms.
  • The selection of plants available is very limited and, let's face it, not always very well chosen.
  • Many of the plants have rather dodgy textures. (I told you it was a rush job, didn't I?)


Variants

I've marked the different variants with different background colors depending on my opinion about them (you're free to make up your own mind of course). Green means can be useful, yellow means don't rue it out completely, red is useless.

System trees:

  • Actual trees:
    • Cypress 1
      • I'm not sure what kind of tree this is, it certainly doesn't look like a cypress to me. 
    • Cypress 2
      •  Not really a cypress. That is, the texture seems to be of a cypress (hard to tell with the low resolution) but the shape is all wrong. It's still quite useful as a generic small early summer hardoow tree though and there is a reason why it seems to be one of the most popular (or should I rather say least unpopular?) system tree.
    • Dogwood
      •  The texture may be a drawing or it may be an over-edited photo, not sure.
    • Eucalyptus
      •  One of the best textures in the set but the trunk shape is too angular.
    • Oak
      • This is not an oak, it's a maple! A very small one in brownish-red automn colors. I've makred it as yellow partly because of the diminutive size, partly because it's been so overused. In the right settigns it can actually be very effective.
    • Palm 1
      • A really nice and amazingly realistc looking coconut palm. 
    • Palm 2
      • A half withered coconut palm. This is one of the better system trees but it's so small. A palm as old as this one obviously is, should be twice as tall.
    • Pine 1
      • It looks more like a spruce than a pine to me but it's hard to tell withut more details. This is definitely one of the better system trees although the bark texture look a bit too simplistic.
    • Pine 2
      • This too looks more like a spruce than a pine to me but it's hard to tell withut more details. This is also one of the better system trees but I don't think it's quite as good as Pine 1
    • Winter Aspen
      • A with birsh branch and a bare branch edited to be all white. It can work in a winter fantasy setting.
    • Winter Pine 1
      • A spruce (or possibly pine) with some white blotches added to simulate snow. It doesn't sound very promising but it actually works.
    • Winter Pine 2
      • With even more fake snow than Winter Pine 1 and it still works quite well. At least in a fantasy settings. Trees hardly ever get their trunks covered by snow this way.
  • Bushes:
    • Plumeria
      •  Ridiculously oversized by default and with a rather tacky drawing based texture. I've marked it with red here but I have actually seen it been used effectively. The poor texture means it won't work anywhere near an upfront setting but if people could jsut be bothered to scale it down, it might do as a decent background plant and as a supplement to dense groups of other system plants.
    • Tropical bush 1
      • Really nice photo based texture
    • Tropical bush 2
      • Really nice photo based texture.
  • Other land plants:
    • Beach Grass
      • A clump of grass that should work everywhere, not just on beaches. It's very dense though and tend to look rather "blocky". The texture is a photo.
    • Fern
      • A susprisingly good system plants, one of the best and unlike so many of the others, it works in many settings. The only real limitation is that the color is very bright green. The texture is a photo.
  • Aquatic plants:
    • Eelgrass
      • A really good generic green plant. It works as a reular grass clump above water too and ir probably better that the beach grass for that.
    • Kelp 1
      • Brown kelp. This is one of the really good ones. The only real limitation is that you only get a single plant for one land impact. The texture seems to be based on a drawing, probably an illustration from an old textbook.
    • Kelp 2
      • Green kelp. Apart from that, more or less the same as Kelp 1.
    • Sea Sword
      • This is one of the gems of the set. The texture is a photo.

System grass:

  • Actual grass:
    • Grass 0
      •  A really good generic grass texture but like all the grasses, with only 32 scattered instances it's hard to make much out of it. The texture is a photo.
    • Grass 1
      • A very dense clump of grass, way too dense to be useful. The texture is a photo.
    • Grass 2
      • The same as Grass 0, only taller.
    • Grass 3
      • Another wayy too dense clup of grass. The texture is a photo.
    • Grass 4
      • Grass 0 with the tops of the straws tinted red to make it look like late summer/autumn grass. That idea works well but it still ahs the same limitations as Grass 0
  • Undegrowth:
    • undergrowth_1
      • A spread of low shrubs, I'm not sure abut the species but it seems like alder to me. One of the hidden gems of the selection.

Custom system vegetation

In theory it's fairly easy to make custom system vegetation. Each variant is made from a single texture and a small set of parameters and all the data is stored locally in two xml files. In reality this is only an option for closed single user grids though. System vegetation is all client-side, so unless you can convince everybody to use your custom xml files, only you wil be able to see your creations.

But if you want to give it a try, here are the parameters (no info aout what they do yet, sorry).

System trees:

  • tree name
  • species_id
  • texture_id
  • droop
  • twist
  • branches
  • depth
  • scale_step
  • trunk_depth
  • branch_length
  • trunk_length
  • leaf_scale
  • billboard_scale
  • billboard_ratio
  • trunk_aspect
  • branch_aspect
  • leaf_rotate
  • noise_mag
  • noise_scale
  • taper repeat_z

System grass:

  • name
  • species_id
  • texture_id
  • blade_size_x
  • blade_size_y

Common Staircase dimensions


Common Staircase dimensions

The most important measurement for a staircase is the sum of two risers (the height of each step) and one tread (the depth of each step). For a staircase to be comfortable to walk, this should be:


RL 133% 150% 200%
Min. 61 cm 81 cm 91.5 cm 122 cm
Ideal 62 cm 82.5 cm 93 cm 124 cm
Max. 63.5 cm 84.5 cm 95.25 cm 127 cm


Risers


RL 133% 150% 200%
Min. 12 cm 16 cm 18 cm 24 cm
Typical 16 cm 21 cm 24 cm 32 cm
Max. 21 cm 28 cm 31.5 cm 42 cm


Treads


RL 133% 150% 200%
Min. 25 cm 33 cm 37.5 cm 50 cm
Typical 30 cm 40 cm 45 cm 60 cm
Max. 40 cm 53 cm 60 cm 80 cm

Width

Since 2017 Norwegian bulding code regulations specify a minimum width of 1.10 m. Before that 0.9 m was the minimum. I haven't checked regulations from other coutnries but this seems fairly typical.

Common Human dimesions


Human sizes

It's probably just as well to simply link to Wikipedia's List of average human height worldwide, no need to repeat the same data here.

But please be aware that the various readings you can get of your avatar's height can be very unreliable. The only reliable way to measure your avatar's actual height is to rez a prim and scale it to the same height as your avatar.


Human proportions


See the article in the assets section.

Common Floor dimensions

Common Floor dimensions

Not much here yet but 18-20 cm is a reasonable RL figure for floor thickness. That means:
  • 133% scale: 24-27 cm
  • 150% scale: 27-30 cm
  • 200% scale: 36-40 cm

Common Door dimensions

Common Door dimensions

Door openings

It should be unnecessary to mention but just in case, you usualy want the door opening to be a bit wider and taller than the actual door to allow room for the frame.

Residental entrance doors

RL 133% 150% 200%
Height
Min. 2 2.7 3 4
Typical 2.2 2.9 3.3 4.4
Width
Min. 0.6 0.8 0.9 1.2
Typical 0.8 1.1 1.2 1.6
Max. 1 1.3 1.5 2


Residental interior doors

RL 133% 150% 200%
Height
Min. 1.9 2.5 2.9 3.8
Typical 2 2.7 3 4
Max. 2.1 2.8 3.2 3.8
Width
Min. 0.6 0.8 0.9 1.2
Typical 0.7 0.9 1.1 1.4
Max. 1 1.3 1.5 2


Door handles and door knobs

Mounting height

RL 133% 150% 200%
Typical 1.05 1.4 1.6 2.1

Door knob diameter

There are two standard diameters for door knobs, 2 3/8 and 2 3/4 inches. That is for the mounting plates of the knob, the head will be a little bit smaller.

RL 133% 150% 200%
2 3/8 6 cm 8 cm 9 cm 12 cm
2 3/4 7 cm 9.5 cm 10.5 cm 14 cm

Common Wall dimensions


Common Wall dimensions

Height


Thickness


RL 133% 150% 200%
Outer walls 25 cm 33 cm 38 cm 50 cm
Divider walls 10-15 cm 13-20 cm 15-23 cm 20-30 cm


Plank walls

Even with metrics, wood plank dimensions are still roughly based on the old inch measurements. An inch is close to 2.5 cm and that's a good increment for plank dimensions anyway. 10, 12.5 and 15 cm (4, 5 and 6 inches) are fairly common for plank sidings. Depending on the construction, there may be some overlapping. Reasonable number of plank widths per meter of wall:

RL 133% 150% 200%
Min. 6.5 5 4.5 3.5
Max. 11 8 7.5 5.5


Brick walls

We have som much to say about brick walls, we gave them their own page.

Common Roof dimensions

Common Roof dimensions

Work in progress. Not much info here yet but more to come. Pitch is the angle of the roof. In RL it is usually given as a width-to-height ratio but I've decided to use angles here.

Gable roofs

Pitch may vary a lot. 45 degrees is often a good compromise but some people think that looks a bit bland.

Some (random) styles:
  • Victorian:  Often very high pitch, especially on high status buildings. Apparently this was to allow for a lot of gable space to decorate.
  • Northern (not coastal) climate: High pitch to make the snow slide off easier.
  • Traditional Northern Norwegian: Very low pitch. The most likely reason is that the higher the pitch, the more vulnerable the roof is to stormy weather.
  • Midwest USA (unconfirmed): Low pitch to make the roof tornado resistant.
  • Thatched roofs: Pitch 45 degrees or more. If it's less than that, rain won't drain off properly so the roof won't be waterproof.

Common Ceiling heights

Common Ceiling heights

Ceiling heights differ a lot.
  • Colder climate usually means lower ceilings to kep the warmth from escaping up.
  • Victorian houses usually have very high ceilings - it was fashionable at that time.
  • U.S. houses tend to have higher ceilings than European ones.
  • Commercial and public buildings tend to have higher ceilings than residentals.


Residental houses


RL 133% 150% 200%
North European
Min. 2.25 3 3.4 4.5
Typical 2.4 3.2 3.6 4.8
Max. 2.5 3.3 3.75 5
Modern U.S.
Typical 2.7 3.6 4 5.4
Victorian
Typical 3 4 4.5 6


Public buildings


RL 133% 150% 200%
Modern
Typical 3 4 4.5 6

Common Window sizes

Common modern window sizes

RL 133% 150% 200%
Height under window
Typical modern 0.75 1 1.125 1.5
Bathroom 1.4 1.85 2.1 2.8
Window height
Typical 1.05 1.4 1.6 2.1
Bathroom 0.6 0.8 0.9 1.2

Common Victorian window sizes

RL 133% 150% 200%
Height from floor to top of sash
Min. 2.13 2.84 3.2 4.27
Max. 2.18 2.91 3.28 4.37
Height under window (from floor to top of ledge)
Public (living room, dining room etc. 0.48 0.61 0.69 0.91
Public and private 0.76 1.01 1.14 1.52
Private (bedroom, study etc.) 0.91 1.22 1.37 1.83
Service (bathroom, kitchen etc. 1.07 1.42 1.6 2.13
Width
Standard Victorian/Edwardian sash 1.22 1.62 1.83 2.44

Friday, 26 April 2019

Common measurements

Index: Common measurements

Common measurements

NO! I do not think we should be straitjaketed into standardized sizes in virtual space!

But sometimes we need it and besides, you have to know the rules to break them properly.

Here are some fairly common RL measurements. I keep these pages mainly as a reference for myself but of course everybody are free to use the data here - and also comment, supplement and correct.

People


Houses


Other buildings


Things


Landscaping


Links

There is so much info all over the internet! If you know of any good general resource sites about measurements of things, let me know. Here's one to get things started:

Tuesday, 26 March 2019

Prim twists

Index: Assets: Prims (primitives): Prim twists

Prim twists

An overview of some of the shapes possible with prims. More to follow.


Equal sided pentangle

  • Prim shape: Box (aka Cube)
  • Size: 1.233 - 0.924 - 0.1
    • If you want a different size, change x and y size proportionally. z size can be anything, it sets the thickness of the shape, not the shape.
  • Path Cut: 0.426 - 0.574
  • Hollow: 67
  • Hollow Shape: Triangle
  • Twist: 45 - 45


Leaf

  • Prim shape: Torus
  • Size: 0.25 - 0.5 - 0.5
  • Path Cut: 0.75 - 1.0
  • Hollow: 95
  • Hole size: 1.0 - 0.25
  • Taper: 1.0 - 1.0
  • Variants:
    • Just play around with the settings and see what happens. ^_^

Rounded cone

  • Prim shape: Torus
  • Twist: 45 - 45
  • Variants:
    • This is the basis for an incredible number and vairety of useful shapes. Keep the two Twist values identical and just go wild with the settings!

Amphora

  • Prim shape: Torus
  • Size: 1.0 - 0.4 - 0.4
  • Rotation: 0.0 - 270.0 - 0.0
  • Hollow: 95
  • Twist: 14 - 14
  • Profile Cut: 0.48 - 1.0
  • Comments:
    • One of the many variants of the rounded cone.

More shapes

Ayumi Cassini's Ultimate guide to prim twisting has a silghtly misleading name - it's certainly not ultimate - but it is a very good introduction with isntructions how to make many useful shapes. Highly recommended!

Landscaping - Landscape items

IndexLandscaping: Landscape items

Landcape items


Are you struggling to think of things to add to your Second Life or opensim landscape? Here are a few ideas:

  • Ground
    • Rocks
    • Cliffs
    • Mountains
    • Caves
    • Dirt
    • Mud
  • Plants
    • Trees
    • Shrubs
    • Grass
    • Hedges
    • Mushrooms
    • Tree/tree stumps
    • Vegetation rubble
      • Leaves
      • Tree stumps
      • Wood splinters
      • Twigs
  • Water
    • Rivers
    • Creeks
    • Waterfalls
    • Puddless
    • Lakes
  • Animals
    • Mammals
    • Insects and spiders
    • Reptilians (turtles/snakes)
    • Amfibians (frogs/toads)
    • Fishes
    • Birds
    • Animal related objects
      • Spider webs
      • Bee hives
      • Birds' nests
      • Animal tracks
      • Mole hills
      • Burrows / Hives
      • Beaver lodges and beaver dams
    • Animal rubble
      • Dead animals
      •  Old snake skins
      • Animal droppings
  • Environment
    • Weather
    • Snow
    • Fog/Mist
    • Sounds
  • Man made
    • Campfires
    • Garbage
    • Radio/cellphone station masts on hilltops
    • Electricity cables on masts
    • (Outdoors) furniture
    • Fences and stonewalls
    • Roads and paths
    • Ports, piers and quays
    • Enbankments
    • Bridges
    • Ruins
    • Vehicles (abandoned or simply parked)
    • Smaller buildings (trailers, kiosks etc.)

The list goes on and on. If yu have something to add, please post it either as a comment ehre or in the four thread!

Sunday, 17 March 2019

Lag: Geometry (prims, meshes and sculpts)

What is this thing called lag?

Prims, Meshes and Sculpts


I suppose we've all heard it:
  • Prims are laggier than meshes
  • Meshes are laggier than prims
  • Sculpt are laggier than meshes
  • Meshes are laggier than sculpts
  • Sculpts are laggier than prims
  • Prims are laggier than sculpts
Hold on, this can't possibly all be true!
Yes, it can.

Rendering an object isn't a single operation. It takes several steps and the various materials we can build with load the different steps differently. There is no textbook answer to which material is the laggiest. A good general rule is to try to find a balanced combination to even out the load as much as possible.

The four main stages in the rendering process are:
  • Asset lookup
  • Download
  • CPU processing
  • GPU processing
Here are quick descriptions of them. This is all about the impact the actual shapes have on the lag. There are lots of other factors too of course but apart from a brief mention of textures at the end, I think we'll leave those for other articles.

Asset lookup

Each item, whether it's a prim a mesh or a sculpt, is stored as an entry in a huge database called the assets database. That database also contains entries for all other assets, every texture, avatar, region, parcel... absolutely everything that exists on the grid (and also lots of things that once existed but have been deleted). The Second Life assets database has billions of entries. Smaller grids have smaller bases of course but they also tend to have less powerful assets servers and even a fairly minor grid may well have millions of entries in its assets database.
Ideally you want something like Bigtable (Goggle's ultra-fast database software) for this but it's expensive. What we use instead, is MySQL, an old open source datbase system that is not built for speed.
The result is that finding an item is quite a lot of work for the assets server. It doesn't matter if the asset is a prim, a mesh or a sculpt though. That is, prims are slightly faster since they only need the database data while sculpts and meshes also need an additional file. The difference is marginal though so as far as the assets server is concerned, it doesn't matter if it's prim, mesh or sculpts. It's the number of parts that counts. However, prim builds do tend to be made from more parts than meshes and sculpts so for that reason prims are generally heavier on the assets server than the other two.


Download

Prims

I don't have any exact information but we're talking low hundreds, certainly not thousands of bytes (not including the textures).
Stipulating 0.5 KB transfer time for each prim will be:
  • 1 mbit/s connection: 0.4 ms
  • 10 mbit/s connection: 0.04 ms

Sculpts

An optimized sculpt without alpha channel will typically require somewhere between 6.2 and 6.5 KB of data. If the sculpt map has an alpha channel, the file size might be slightly more than 8 KB.
A regular unoptimized sculpt map will typically have a file size of about 25 KB without and 33 KB with an alpha channel. So:
  • 1 mbit/s connection:
    • Optimized no alpha: 5 ms
    • Optimized with alpha: 6.5 ms
    • Unoptimized no alpha: 20 ms
    • Unoptimized with alpha: 26 ms
  • 10 mbit/s connection:
    • Optimized no alpha: 0.5 ms
    • Optimized with alpha: 0.65 ms
    • Unoptimized no alpha: 2 ms
    • Unoptimized with alpha: 2.6 ms
In other words, even at the best of conditions we have to expect it takes more than ten times as long to download a sculpt as it takes to download a prim and it may well take more than 50 times as long.

Mesh

The file size of a mesh is hard to predict but if we say 1 KB "overhead" plus 0.006 KB per vertice, we should be in the right ballpark. That means:
  • 1 mbit/s connection:
    • 10 vertices: 8 ms
    • 100 vertices: 12.8 ms
    • 1,000 vertices: 56 ms
    • 10,000 vertices: 488 ms
    • 65,536 vertices: 3154 ms
  • 10 mbit/s connection:
    • 10 vertices: 0.8 ms
    • 100 vertices: 0.13 ms
    • 1,000 vertices: 5.6 ms
    • 10,000 vertices: 48.8 ms
    • 65,536 vertices: 315 ms

CPU processing

Before an asset can be sent to the graphics processor, it has to be decoded by the central processor. This part of the rendering flow has been all but overlooked until recently but it turns out it's a major bottleneck and it's not at all unusual for the gpu to spend more than half it's processing time idly waiting for the cpu to finish its part of the job. It's hard to quantify how much impact the various bulding materials have on the cpu load but the obvious differences are large enough it's easy to rank them:
  1. Prims: very fast
  2. Regular mesh: quite fast
  3. Optimized sculpts: rather slow
  4. Unoptimized sculpts: slow
  5. Fitted mesh: very slow

GPU processing

The gpu load depends on a lot of factors, various graphics settings, the number of textures, special effects etc. But if we focus only on the factors directly related to the geometric shapes:
  1. Optimized mesh: as fast as can be.
  2. Optimized prim builds: almost as fast as can be.
  3. Unoptimized prim builds: usually more than fast enough.
  4. Efficient sculpts: not ideal but not a serious problem unless there are lots of them.
  5. "Mole mesh": about the same as sculpts.
  6. Inefficient sculpts: can often cause serious problems.
  7. Unoptimized mesh: can be anything from not very good to absolutely disastrous.
  8. Fitted mesh: Poor and unfortunately that's not something we can do anything about. There are a number of bugs in the software that can't be easily fixed and mean that fitted mesh can't really be optimized.

(Mole mesh is my name for partly optimized mesh. The high detailed model is usually quite well optimized but the LoD models have far more triangles and vertices than they should have. It's what you get if you let the mesh uploader generate your LoD models and set the values for them high enough to avoid collapsing LoD. I call it Mole mesh because it's the method the Moles, Linden Lab's hired builders, use. I really don't know whether this method should be condemned or not. It's certainly not something a skilled mesh maker would do but not all builders are technically skilled mesh makers and Mole mesh is certainly a far lesser evil than the far too common collapsing LoD variant.)

Other building materials

There are five building materials I haven't mentioned above, rigged mesh, liquid mesh, animesh, system vegetation and particles. I don't really have much reliable data about these but:

Rigged mesh and liquid mesh

These are similar to fitted mesh but use simpler rigging. There is no difference when it comes to the assets server and download file size and there shouldn't be any significant difference to the gpu load. The simpler rigging might mean less cpu load though and casual observation seems to confirm this.

Animesh

Animesh is Second Life only and so new there's not much data available. We should expect abuot the same performance as fitted mesh though.

System vegetation

System vegetation is Linden Lab's clone of a way outdated version of SpeedTree. System vegetation is fairly simple low poly procedural obejcts that shouldn't cause much load to any part of the system. There is however something strange about how their textures are handled and that may indicate unnecessarily high cpu and/or gpu load.

Particles

Particles are sprites, free floating textures not applied to any surface. Unless there is something really weird going on in the software, they won't cause any assets server or cpu load worth mentioning. When it comes to downlaoding and gpu processing it's the same as for any other textures. But particles are nearly always partly transparent and they move. Both those two factors cause significant extra gpu load and excessive use of particles can be very hard on the graphics processor.

Textures

Textures and their impact on lag need a separate article but that'll have to wait. Or maybe you should check out The Deadly Sins Of Texturing. It's not a complete presentation of texture lag issues but it does cover the worst mistake builders often make.

There is one thing I really should mention here though:
Despite what some people seem to believe, there is no difference whatsoever how the software handles textures for prims, sculpts and meshes.
No, there really isn't. Builders do tend to texture different materials differently but those are conventions. But as far as the software is concerned, all it knows is that it's supposed to slap this texture onto that surface. Whether the surface is on a prim, a sculpt or a mesh, makes no difference.

Updates

Like most posts in the blog, this article is under constant revision. If you have any comments, corrections or additional info, you can post it as a comment ont he blog or at one of the two large SL forums:

Lag

Thursday, 28 February 2019

Landscaping

Index:  Landscaping

Landscaping

Related articles:

Look at this.


What's so special about it? There's not a single item there, it's all landscaping. It's a work in progress of course. I need to find a better texture for the hilltops (probably grassy - they aren't that high), the riverbanks are too steep and there will be some plants and rocks and such eventually. But it should still illustrate how much good terraforming can add to a scene. And it comes at no performance cost - in fact the flatter the ground is, the laggier it gets.

There's so much I should have said about terraforming, both the principles for good landscape shapes and practical ways to do it, but time is short and for now I just to leave you with this picture as some food for thought.

Except, I stumbled across this video by WASD20. It lists some of the most fundamental principles for creating a credible landscape and is well worth watching.


>

You should go to the YouTube page and check out the comments too. There are lots of good tips posted there.

Sunday, 24 February 2019

Tutorials

How to select a face

How to select a face

For those familiar with building for other virtual environments: A face is what is usually known as a material. Same thing, different name.

If you have no experience as a content creator: A prim, sculpt or meshis made from anything from one to eight (in one special case nine) faces. You can add different textures and other surface effects to each face.

If you know how to select them that is:
Right-click on the object and select "Edit".
In the Edit window, click on the "Select Face" radio button.
Then click on the "Texture" because that's where you find all the face related functions.

That's all. Only, rememmer to close the Edit window when you're done.


How to move and rotate an object

How to move and rotate an object

As so often in Second Life and on opensim, there are several ways to do the same thing. We're gomg to look at two of them here.

But before you try it yourself:
READ THE WARNINGS AT THE END OF THE ARTICLE!!!

Moving an object the simple way

  • Right click on the object and select "Edit".
  • Point your cursor at one of the three arrows that turns up. There is one for each axis:
    • Red: x axis (east-west).
    • Green: y axis (north-south).
    • Blue: z axis (up-down).
  • Make absolutely sure you cursor is at the right position. The active arrow will light up slightly so it's easy to see.
  • Click and hold mouse button and move the mouse.
  • Close the Edit window.

Rotating an object the simple way

  • Right click on the object and select "Edit".
  • Hold down the Ctrl key.
  • Point your cursor at one of the three circles that turns up. There is one for each axis.
  • Make absolutely sure you cursor is at the right position. The active circle will light up slightly so it's easy to see.
  • Click and hold mouse button and move the mouse.
  • Close the Edit window.

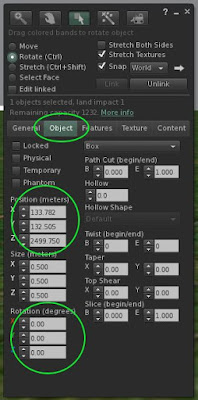
Precision positioning and rotation

  • Right click on the object and select "Edit".
  • Click on the "Object" tab in the Edit window that pops up.
  • Type the values you want in the "Position" and/or "Rotation" fields.
  • Close the Edit window.

THE MAJOR WARNINGS

The developers and programmers who made the viewers are generally skilled professionals and well meaning people. But they don't know much about how to make user friendly interfaces, so they've made lots of mistakes there. This is the main reason why Second Life and opensim are often regarded as difficult to use.

Most of these mistakes are no more than minor nuisances and you even get used to them. Some can be disastrous though and two of those are about object positioning.

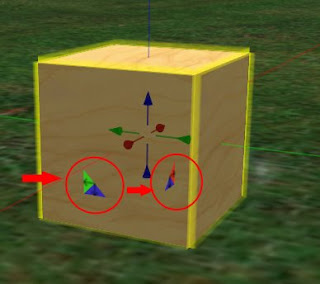
The triangle trap

When you move the object the simple way, you'll see some blue, red and green triangles around the object. DO NOT CLICK ON THEM! I think they are there to let you move along more than one axis at the same time but they are very unpredictable and if you try to use them, the object will jump far away from where you want it. Sometimes it moves so far it's lost for good.


The overflowing entry field trap

When you do precision positioning.
This does not apply to the regular Second Life viewer but Firestorm and some other viewers have crammed far more decimals into the Position fields than there is room for. When you type new values in those fields, make sure everything already in the field is selected first. If you don't, the object may fly away and be lost forever.

Some minor warnings


There are also three other factors that aren't serious mistakes (or mistakes at all) but you should be aware of:

The transparent white sphere

You'll see it when you rotate the simple way. Clicking on it allows you to rotate around more than one axis at the same time. This is the rotation equivalent to the triangle trap but it's not nearly as critical. It's still hard to control though so you probably want to avoid it.

The positioning limits

There hardly are any. So make sure you don't move the object so far away you loose it.

The rulers

This is not a flaw, it's a very useful feature. The only problem is that it can be surprising and confusing if you're not aware of it.

When you move or rotate an object the simple way, some lines/circles with numbers along them turn up. Move your cursor onto them and the changes become stepwise. Really handy if you're familiar with it, not so much if you aren't.

How to maneuver your camera

How to maneuver your camera

You can't build well if you can't examine your work from all angles, so this is absolutely essential.

There are lots of ways to change your camera position but since this is part of the absolute essentials series of tutorials, we'll keep it as simple as possible and only describe one way

Rotate camera position around an object

  • Hold down the Ctrl and Alt keys.
  • Click on the object and hold mouse button down.
  • Move your mouse.

    Traverse the camera

  • Hold down the Shift, Ctrl and Alt keys.
  • Click on the object and hold mouse button down.
  • Move your mouse.

    Zoom in or out

  • Hold down the Alt key.
  • Click on the object and hold mouse button down.
  • Move your mouse.

    Switch back to default camera position

  • Click the Esc key.
  • If that doesn't work, click the Esc. key again.

How to remove an object

How to remove an object

Right-click on it and select "Delete" from the menu that pops up:


It couldn't be easier than that. Except maybe:
  • The picture is taken with the Firestorm viewer. The Delete option may be located elsewhere in the menu on other viewers. Usually that shouldn't be hard to figure out though. However:
  • A few viewers use a "pie chart" menu. If you use one of them, you have to click on "More" before you find the delete option.

Oh no! I didn't men to do that!!!

Did you delete something by accident? Don't worry, all is not lost.

The iten is not completely gone yet, it has just been moved to the trash folder in your inventory. To recover it:
You still have to reposition it but at least you don't have to rebuild from scratch.

How to rez an object

How to rez an object

Yes, "rez" is not a very good word but we're stuck with it. Blame it on Disney, it's from their 1982 movie "Tron" .

What it means, is to add an object to the scene and we can do it in two ways, we can rez an item from our inventory or we can rez a brand new prim.

Rezzing from from your inventory

  • Open your inventory (Ctrl-I)
  • Find the item you want to rez
  • Click on it and hold the mouse button while you drag it onto the spot you want to be.
You almost certainly have to adjust the position aftewards but that's for an other article.

Rezzing a new prim

This will create a brand new (prim) object. There are several ways to do this but I think the easiest is:
  • Open your Build palette (Ctrl-4). Your cursor will change into a "magic wand".
  • Click on the spot you want the prim to appear and there it is!
Again, you almost certainly want to adjust its position and of course you want to edit the prim to make it look the way you want

Thursday, 21 February 2019

Deadly Sins of Texturing

The Seven 17 Deadly Sins of Texturing

What is good texturing? There are so many rules and exceptions to the rules and so many subjective factors to take into account. The only universal rule is:

Keep the number of pixels and number of textures as low as possible.

But what is possible? We can argue about that for ages and never agree.

Even so, there are some mistakes that are so clear and obvious you just don't make them, at least not if you want to be taken seriously as a skilled content creator. Here are some of them. I have a feeling this list will grow over time...

1. Repeat inflation

This is sadly a common practice for many commercial texture merchants. You take a 512x512 texture and copy and repeat it to make a 1024x1024. The reason they do this, is that 1024 textures tend to sell better to ignorant builders than 512's. Apart from that, it's completely pointless. We have a perfectly good built in texture repeat function that does exactly the same without increasing the lag.


2. Resolution inflation

This is another trick used by texture merchants to fool customers into believeing their textures have higher resolution. It's simple, take a 512x512 - or even a 256x256 - and scale it up before you upload. It won't increase the amount of details or the quality but it looks good on the MP listing page.


3. Colour inflation

This is only a deadly sin under certain circumstances,so read on!

The third common merchants' cheat is to do quick-and-dirty recolouring in a graphics program before uploading. It's an easy way to boost your selection of merchandise.

Now, don't get me wrong here: a proper recolouring that takes into account that different parts of the texture needs different treatment, makes a lot of sense. It's only a deadly sin when they add a flat tint all across the texture because that is much better done inworld with the colour tool.


4. Excessive resolution

As I said in the introduction, we can discuss forever how high the resolution needs to be so this isn't necessarily a deadly sin. But there are some cases so extreme there simply is no excuse for them.

Like a certain well known and prestigious maker who use 1024x1024 textures for the shadow prims underneath his meshes. I don't care how much you sell or how good a designer you are. If you make mistakes like that, you don't know how content in a virtual reality works and you have no right to call yourself a builder.


5. Monochrome textures

This is a special case of nos 3 and 14: a texture with the same colour all over it. We have a default blank texture and it can be retinted to a million different colours. Use that instead.


6. Quasi-baking

Baked textures add a lot of lag, not because they are laggier as such, but because they aren't very reusable so we need custom textures for each and every object.

It can be worth it though because it allows us to add far more details. But sometimes we see "baked" textures that are nothing but a UV map superimposed onto a repeated texture. Don't you ever do that!


7. Empy UV maps

Aka "The Blender Bake Fail".

Baked textures where most of the texture surface isn't used at all.


8. Multiple copies of the same texture

Each copy has to be donwloaded separately and stored separately. Do I have to say more?


9. Mirrored textures

A special case of no. 7: two textures that are exact mirror copies of each other. We do have a built in mirror function, you know...


10. Hidden textures

Textures only used on surfaces hidden inside the object. They have no function whatsoever but they add to the load.

It's acceptable for temporary builds but if it's something you're going to keep, maybe even distribute, clean it up. It only takes a minute.


11. Uneven texel density

Some part of a scene have very high texture resolutions, others much lower. This actually reduces the overall visual quality because the contrast itself becomes an eyesore.

This isn't always a deadly sin because a scene is usually built from multiple objects that weren't specifically made to work with each other and in those cases, it can't be blamed on a single person.


12. Atlas abuse

A texture atlas is a single texture that is made from several smaller ones merged into one file. It is a brilliant idea when done well because it can significantly reduce the number of textures used.

But it only makes sense if all (or at least most of) those smaller textures are actually used in the same scene. If not, it's a deadly sin.


13. Rougue alphas

Rougue alphas come in two different flavours: alpha channel added to texturs with no transparency and transparency added only to the unused parts of a (usually baked) texture.

This is a special one bcause many image editors (like GIMP and Photoshop) have the habit of adding alphas to textures whether you need them or not so it can be very hard to avoid doing it by accident. So don't feel guilty if you do it every now and then. It's only a Deadly Sin if you keep doing it all the time.


14. Custom full transparency/blank textures

A special case of no. 8. We have one default fully ransparent texture and one default blank, both at a nice and low 32x32 resolution. We do not need more than that.

Except if you want to shave off a tiny little bit of lag by using textures with even lower resolution that is.


15. Noisy emptiness

This applies to alpha cutout textures and baked textures. These textures will always have parts that are not actually seen and sometmes these parts are full of different hidden colours. This can increase their file size and thus download time considerably and that's not a good idea, is it?


16. Textures for geometry

This is a tricky one because there is no hard rule here. Texture pixels is nearly always a more important cause for lag than mesh triangles and vertices. Usually you need to be able to get rid of hundreds, even thousands, of tris to justify adding a single extra texture. So be careful if you try to save on geometry by adding textures and/or normal maps! Unfortunately Second Life's land impact algorithm doesn't know this. It penalizes extra tris heavily and completely ignores texture pixels.


16. Preloader abuse

I think I'll quote a comment by Dom Daddy on the Second Life forums here. He said it so well:

"people who put all of their textures on a prim inside the pants so that when they use the HUD it 'loads faster'... but makes everyone around them load 50+ 1024's while they are wearing a simple pair of jeans"

There are some very rare situatins when preloading textures is necessary or even good for the perceived performance but it only applies if it's almost certain those textures will be needed very soon and even then, think twice before you add a preloader.