Tutorials: Creating LoD models, case study 2, Lesson 7
Creating LoD models
Case study 2: Lesson 7 - Getting physical
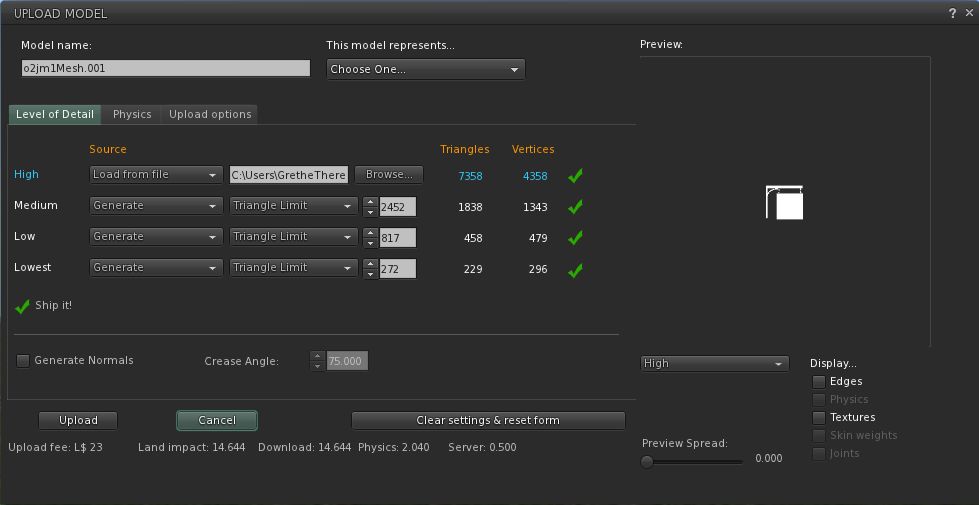
Finally time to upload:

We got the download weight down to 1.389, that's low enough to be rounded down to 1. Yay! ![]()
The physics weight is 1.4 though, not high enough to make a difference to the LI but even so, is that really necessary? People may bump into the sign every now and then but they're not likely to ever try to walk all over it. A cube would make a much better physics model than whatever the uploader generates (and if you thought GLOD was horribly bad at his job, just look at what lunacies his physics generating brother can dream up!)

0.36 physics weight, that's more like it.
I think most mesh makers know this but just in case:
Make two dae files, one with a single triangle and one with a simple cube, and save them in an easy to find spot on your harddisk. Use the triangle (0.200 physics weight) as physics model for items that don't really need physics at all and the cube (0.360 physics weight) for anything avatars and/or moving physical objects are going to bump into. No need to worry about the size of these two meshes, the uploader will automatically scale them to the same size as the main model.
But the proof is in the pudding...
And here it is. High LoD:

Mid:

Low:

Lowest:

And a few details:

Finally time to upload:
We got the download weight down to 1.389, that's low enough to be rounded down to 1. Yay! ![]()
The physics weight is 1.4 though, not high enough to make a difference to the LI but even so, is that really necessary? People may bump into the sign every now and then but they're not likely to ever try to walk all over it. A cube would make a much better physics model than whatever the uploader generates (and if you thought GLOD was horribly bad at his job, just look at what lunacies his physics generating brother can dream up!)
0.36 physics weight, that's more like it.
I think most mesh makers know this but just in case:
Make two dae files, one with a single triangle and one with a simple cube, and save them in an easy to find spot on your harddisk. Use the triangle (0.200 physics weight) as physics model for items that don't really need physics at all and the cube (0.360 physics weight) for anything avatars and/or moving physical objects are going to bump into. No need to worry about the size of these two meshes, the uploader will automatically scale them to the same size as the main model.
But the proof is in the pudding...
And here it is. High LoD:

Mid:

Low:

Lowest:

And a few details:


A final word
We keep talking about keeping the LI down but this is also a way to increase the amount of fine details in the full high resolution model.
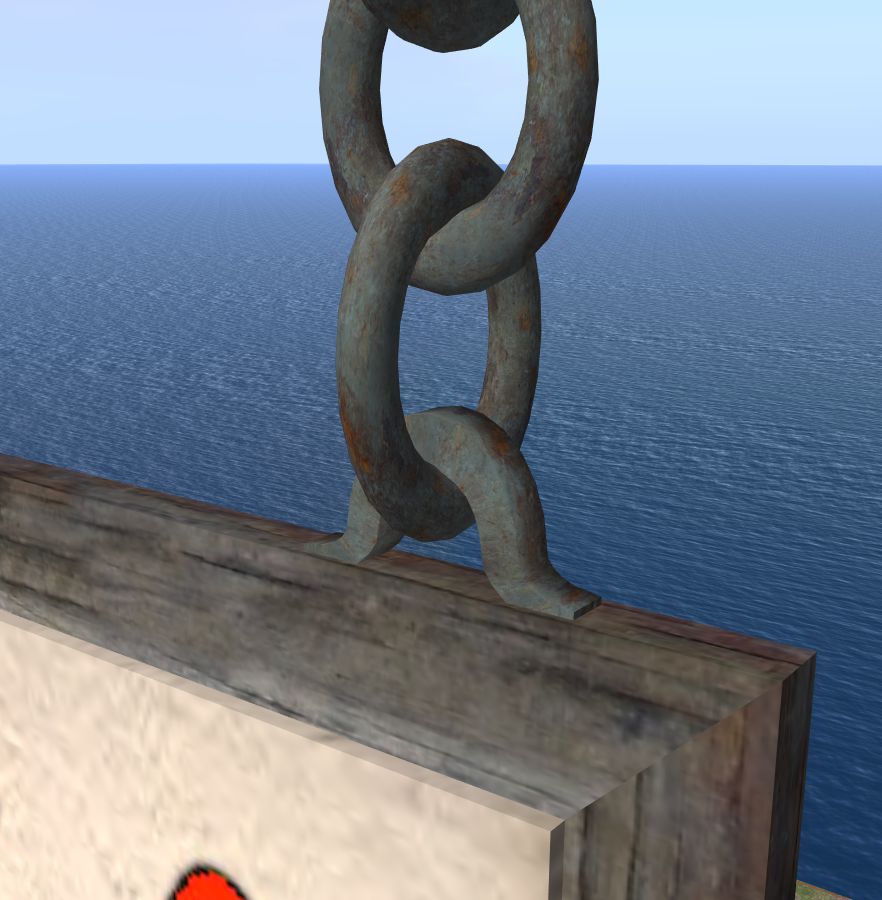
The challenge with this sign was of course the chain, the other parts are very simple. The common solution would be to reduce the curve resolution for the chain links but I really wanted to avoid that. Don't get me wrong, I have nothing against octagons and hexagons, some of my best friends are...
No, they aren't really. Anyway: there is a time and a place for everything but a rugged chain is not the place for any kind of polygons.
These efficient modelling techniques meant that I could afford properly rounded chain links. They may actually be a bit too round, perhaps I should remove a few vertices from them just to make them look more natural before I upload to the main grid.
Resource efficient modelling is not about saving for the sake of saving, it's all about getting more for less.
A final final word
After I wrote this tutorial and took all the pictures, I made a few more tweaks and got the download weight down to 0.732:

This didn't affect the land impact of course since it already was as low as it can be but every tri and vertice we can eliminate is a tri or vertice our GPUs don't have to worry about. How I did it? I can't remember but it must have been some tris in the lowest LoD model that turned out not to be neccessary. There's always room for improvement and there's always new tricks to discover. I've been making mesh for Second Life and opensim for more than seven years now and I'm still learning.
A final final final word (to keep people from suing me)