Thursday, 28 February 2019

Landscaping

Index:  Landscaping

Landscaping

Related articles:

Look at this.


What's so special about it? There's not a single item there, it's all landscaping. It's a work in progress of course. I need to find a better texture for the hilltops (probably grassy - they aren't that high), the riverbanks are too steep and there will be some plants and rocks and such eventually. But it should still illustrate how much good terraforming can add to a scene. And it comes at no performance cost - in fact the flatter the ground is, the laggier it gets.

There's so much I should have said about terraforming, both the principles for good landscape shapes and practical ways to do it, but time is short and for now I just to leave you with this picture as some food for thought.

Except, I stumbled across this video by WASD20. It lists some of the most fundamental principles for creating a credible landscape and is well worth watching.


>

You should go to the YouTube page and check out the comments too. There are lots of good tips posted there.

Sunday, 24 February 2019

Tutorials

How to select a face

How to select a face

For those familiar with building for other virtual environments: A face is what is usually known as a material. Same thing, different name.

If you have no experience as a content creator: A prim, sculpt or meshis made from anything from one to eight (in one special case nine) faces. You can add different textures and other surface effects to each face.

If you know how to select them that is:
Right-click on the object and select "Edit".
In the Edit window, click on the "Select Face" radio button.
Then click on the "Texture" because that's where you find all the face related functions.

That's all. Only, rememmer to close the Edit window when you're done.


How to move and rotate an object

How to move and rotate an object

As so often in Second Life and on opensim, there are several ways to do the same thing. We're gomg to look at two of them here.

But before you try it yourself:
READ THE WARNINGS AT THE END OF THE ARTICLE!!!

Moving an object the simple way

  • Right click on the object and select "Edit".
  • Point your cursor at one of the three arrows that turns up. There is one for each axis:
    • Red: x axis (east-west).
    • Green: y axis (north-south).
    • Blue: z axis (up-down).
  • Make absolutely sure you cursor is at the right position. The active arrow will light up slightly so it's easy to see.
  • Click and hold mouse button and move the mouse.
  • Close the Edit window.

Rotating an object the simple way

  • Right click on the object and select "Edit".
  • Hold down the Ctrl key.
  • Point your cursor at one of the three circles that turns up. There is one for each axis.
  • Make absolutely sure you cursor is at the right position. The active circle will light up slightly so it's easy to see.
  • Click and hold mouse button and move the mouse.
  • Close the Edit window.

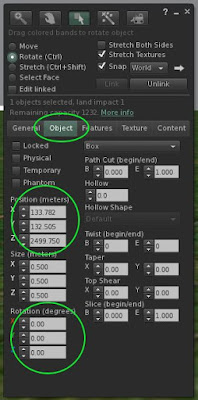
Precision positioning and rotation

  • Right click on the object and select "Edit".
  • Click on the "Object" tab in the Edit window that pops up.
  • Type the values you want in the "Position" and/or "Rotation" fields.
  • Close the Edit window.

THE MAJOR WARNINGS

The developers and programmers who made the viewers are generally skilled professionals and well meaning people. But they don't know much about how to make user friendly interfaces, so they've made lots of mistakes there. This is the main reason why Second Life and opensim are often regarded as difficult to use.

Most of these mistakes are no more than minor nuisances and you even get used to them. Some can be disastrous though and two of those are about object positioning.

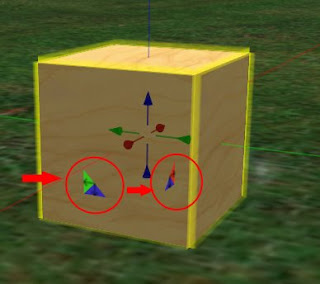
The triangle trap

When you move the object the simple way, you'll see some blue, red and green triangles around the object. DO NOT CLICK ON THEM! I think they are there to let you move along more than one axis at the same time but they are very unpredictable and if you try to use them, the object will jump far away from where you want it. Sometimes it moves so far it's lost for good.


The overflowing entry field trap

When you do precision positioning.
This does not apply to the regular Second Life viewer but Firestorm and some other viewers have crammed far more decimals into the Position fields than there is room for. When you type new values in those fields, make sure everything already in the field is selected first. If you don't, the object may fly away and be lost forever.

Some minor warnings


There are also three other factors that aren't serious mistakes (or mistakes at all) but you should be aware of:

The transparent white sphere

You'll see it when you rotate the simple way. Clicking on it allows you to rotate around more than one axis at the same time. This is the rotation equivalent to the triangle trap but it's not nearly as critical. It's still hard to control though so you probably want to avoid it.

The positioning limits

There hardly are any. So make sure you don't move the object so far away you loose it.

The rulers

This is not a flaw, it's a very useful feature. The only problem is that it can be surprising and confusing if you're not aware of it.

When you move or rotate an object the simple way, some lines/circles with numbers along them turn up. Move your cursor onto them and the changes become stepwise. Really handy if you're familiar with it, not so much if you aren't.

How to maneuver your camera

How to maneuver your camera

You can't build well if you can't examine your work from all angles, so this is absolutely essential.

There are lots of ways to change your camera position but since this is part of the absolute essentials series of tutorials, we'll keep it as simple as possible and only describe one way

Rotate camera position around an object

  • Hold down the Ctrl and Alt keys.
  • Click on the object and hold mouse button down.
  • Move your mouse.

    Traverse the camera

  • Hold down the Shift, Ctrl and Alt keys.
  • Click on the object and hold mouse button down.
  • Move your mouse.

    Zoom in or out

  • Hold down the Alt key.
  • Click on the object and hold mouse button down.
  • Move your mouse.

    Switch back to default camera position

  • Click the Esc key.
  • If that doesn't work, click the Esc. key again.

How to remove an object

How to remove an object

Right-click on it and select "Delete" from the menu that pops up:


It couldn't be easier than that. Except maybe:
  • The picture is taken with the Firestorm viewer. The Delete option may be located elsewhere in the menu on other viewers. Usually that shouldn't be hard to figure out though. However:
  • A few viewers use a "pie chart" menu. If you use one of them, you have to click on "More" before you find the delete option.

Oh no! I didn't men to do that!!!

Did you delete something by accident? Don't worry, all is not lost.

The iten is not completely gone yet, it has just been moved to the trash folder in your inventory. To recover it:
You still have to reposition it but at least you don't have to rebuild from scratch.

How to rez an object

How to rez an object

Yes, "rez" is not a very good word but we're stuck with it. Blame it on Disney, it's from their 1982 movie "Tron" .

What it means, is to add an object to the scene and we can do it in two ways, we can rez an item from our inventory or we can rez a brand new prim.

Rezzing from from your inventory

  • Open your inventory (Ctrl-I)
  • Find the item you want to rez
  • Click on it and hold the mouse button while you drag it onto the spot you want to be.
You almost certainly have to adjust the position aftewards but that's for an other article.

Rezzing a new prim

This will create a brand new (prim) object. There are several ways to do this but I think the easiest is:
  • Open your Build palette (Ctrl-4). Your cursor will change into a "magic wand".
  • Click on the spot you want the prim to appear and there it is!
Again, you almost certainly want to adjust its position and of course you want to edit the prim to make it look the way you want

Thursday, 21 February 2019

Deadly Sins of Texturing

The Seven 17 Deadly Sins of Texturing

What is good texturing? There are so many rules and exceptions to the rules and so many subjective factors to take into account. The only universal rule is:

Keep the number of pixels and number of textures as low as possible.

But what is possible? We can argue about that for ages and never agree.

Even so, there are some mistakes that are so clear and obvious you just don't make them, at least not if you want to be taken seriously as a skilled content creator. Here are some of them. I have a feeling this list will grow over time...

1. Repeat inflation

This is sadly a common practice for many commercial texture merchants. You take a 512x512 texture and copy and repeat it to make a 1024x1024. The reason they do this, is that 1024 textures tend to sell better to ignorant builders than 512's. Apart from that, it's completely pointless. We have a perfectly good built in texture repeat function that does exactly the same without increasing the lag.


2. Resolution inflation

This is another trick used by texture merchants to fool customers into believeing their textures have higher resolution. It's simple, take a 512x512 - or even a 256x256 - and scale it up before you upload. It won't increase the amount of details or the quality but it looks good on the MP listing page.


3. Colour inflation

This is only a deadly sin under certain circumstances,so read on!

The third common merchants' cheat is to do quick-and-dirty recolouring in a graphics program before uploading. It's an easy way to boost your selection of merchandise.

Now, don't get me wrong here: a proper recolouring that takes into account that different parts of the texture needs different treatment, makes a lot of sense. It's only a deadly sin when they add a flat tint all across the texture because that is much better done inworld with the colour tool.


4. Excessive resolution

As I said in the introduction, we can discuss forever how high the resolution needs to be so this isn't necessarily a deadly sin. But there are some cases so extreme there simply is no excuse for them.

Like a certain well known and prestigious maker who use 1024x1024 textures for the shadow prims underneath his meshes. I don't care how much you sell or how good a designer you are. If you make mistakes like that, you don't know how content in a virtual reality works and you have no right to call yourself a builder.


5. Monochrome textures

This is a special case of nos 3 and 14: a texture with the same colour all over it. We have a default blank texture and it can be retinted to a million different colours. Use that instead.


6. Quasi-baking

Baked textures add a lot of lag, not because they are laggier as such, but because they aren't very reusable so we need custom textures for each and every object.

It can be worth it though because it allows us to add far more details. But sometimes we see "baked" textures that are nothing but a UV map superimposed onto a repeated texture. Don't you ever do that!


7. Empy UV maps

Aka "The Blender Bake Fail".

Baked textures where most of the texture surface isn't used at all.


8. Multiple copies of the same texture

Each copy has to be donwloaded separately and stored separately. Do I have to say more?


9. Mirrored textures

A special case of no. 7: two textures that are exact mirror copies of each other. We do have a built in mirror function, you know...


10. Hidden textures

Textures only used on surfaces hidden inside the object. They have no function whatsoever but they add to the load.

It's acceptable for temporary builds but if it's something you're going to keep, maybe even distribute, clean it up. It only takes a minute.


11. Uneven texel density

Some part of a scene have very high texture resolutions, others much lower. This actually reduces the overall visual quality because the contrast itself becomes an eyesore.

This isn't always a deadly sin because a scene is usually built from multiple objects that weren't specifically made to work with each other and in those cases, it can't be blamed on a single person.


12. Atlas abuse

A texture atlas is a single texture that is made from several smaller ones merged into one file. It is a brilliant idea when done well because it can significantly reduce the number of textures used.

But it only makes sense if all (or at least most of) those smaller textures are actually used in the same scene. If not, it's a deadly sin.


13. Rougue alphas

Rougue alphas come in two different flavours: alpha channel added to texturs with no transparency and transparency added only to the unused parts of a (usually baked) texture.

This is a special one bcause many image editors (like GIMP and Photoshop) have the habit of adding alphas to textures whether you need them or not so it can be very hard to avoid doing it by accident. So don't feel guilty if you do it every now and then. It's only a Deadly Sin if you keep doing it all the time.


14. Custom full transparency/blank textures

A special case of no. 8. We have one default fully ransparent texture and one default blank, both at a nice and low 32x32 resolution. We do not need more than that.

Except if you want to shave off a tiny little bit of lag by using textures with even lower resolution that is.


15. Noisy emptiness

This applies to alpha cutout textures and baked textures. These textures will always have parts that are not actually seen and sometmes these parts are full of different hidden colours. This can increase their file size and thus download time considerably and that's not a good idea, is it?


16. Textures for geometry

This is a tricky one because there is no hard rule here. Texture pixels is nearly always a more important cause for lag than mesh triangles and vertices. Usually you need to be able to get rid of hundreds, even thousands, of tris to justify adding a single extra texture. So be careful if you try to save on geometry by adding textures and/or normal maps! Unfortunately Second Life's land impact algorithm doesn't know this. It penalizes extra tris heavily and completely ignores texture pixels.


16. Preloader abuse

I think I'll quote a comment by Dom Daddy on the Second Life forums here. He said it so well:

"people who put all of their textures on a prim inside the pants so that when they use the HUD it 'loads faster'... but makes everyone around them load 50+ 1024's while they are wearing a simple pair of jeans"

There are some very rare situatins when preloading textures is necessary or even good for the perceived performance but it only applies if it's almost certain those textures will be needed very soon and even then, think twice before you add a preloader.

Immersion

Immersion

(How we perceive the world)

Originally posted in a discussion at the Second Life forums.

When we create something for a virtual world, we want the viewers to loose themselves in it, don't we? We want immersion, we want people to believe this is real! But a virtual reality is not and will never be a detailed copy of Real Life. Nor should it be. In that sense it will never be real and that means people will need to "suspend their disbelief", that is accept that a couple of core factors are different from how they usually are.

There are several well known and proven techniques artists of all kinds use to facilitate suspension of disbelief and immersion. You can play around with timing and with deliberate use of distractions, you can prepare and build anticipation, etc., etc.

To make the most out of these techniques, we need to understand a little bit about how our brains work and how we perceive things. Here are a few factors to consider:

1. We don't think what we think we think

There's so much going on in our brains that we are not consciously aware of. Much of it is never recorded in our memory so it's gone forever in the blink of an eye.


2. We don't see what we think we see

I'm sure we've all been told that what we see is only ten percent what our eyes actually register, the rest is how the brain interprets the data. (Imagine a large list of optical illusion examples here.)


3. Our senses interact

(I could have added long explanation with lots of examples here but I think most people can come up with that themselves.)


4. There are limits to how much we notice

Most of what goes on around us is unnoticed. The brain simply doesn't have the capacity to handle it all so it focuses on what seems important at the moment and ignores the rest.


5. Memory works by association.

New memories are never stored independently, they are "hooked onto" exisitng memories. The more such "hooks" the brain can find for the new data, the easier it is to remember. This is very different from computer memory where every piece of information is stored separately in an orderly fashion. Two of the many consequences are:
  • 5b Almost everything we remember is wrong When an old memory is used as a "hook" for a new one, it is inevitably altered a little bit.
  • 5c First impressions are important Because that will always be one of the strongest "hooks" for subsequent related experiences.


6. Perception is holistic

It's far more about the whole picture than individual details.


7. Our brain is always looking for patterns

If there are no patterns, it makes some up.


8. Things that seem out of place will always draw a lot of attention

I suppose that's just another way to put the previous two points but it's important when we're talking about immersion factors. Put an organutan in a Borneo jungle scene an he fits perfectly in. Seat him in the parliament and he stands out like the proverbial sore thumb (or maybe not but you get the point). My definition of an eyesore, a common SL immersion breaker, is not something that is ugly - an eyesore the way I see it can be really beautiful and amazing. But it breaks the continuity of the scene and draws attention away from what is more important to the whole.


9. The brain is not alone

It's our cpu, yes, but it doesn't do all the work, it is thoroughly integrated with our entire nervous system and even our entire body.


10. Vertical is more noticeable than horizontal

Imagine you are hiding behind a rock and want to take a peek to see what's going on. Stick you head up above the rock and everybody will notice you, sneak a look around the edge of it, and you'll probably get away with it.

I'm not sure if this has anything to do with how our brain works or if it's simply that higher objects tend to stand lut against the background of the sky but it's certainly real and it's something well worth keeping in mind when you want to direct your audience's attention. Point upwards if you want to draw attention to something, sideways if you want to tone it down a bit.


And finally, Chin Rey's addendum to an old publishers' slogan: 

11. Content may be King but without Queen Context, he is nothing at all.


I don't know how Linden Realms are these days since I haven't tried it after they changed it. But it used to be one of the most immersive parts of SL and it's a good example how immersion factors can be applied here.
One thing that is obvious there, is that it's not about highly detailed graphics. The LL scene is about as low poly and "crude" as it gets in SL. But everything had a conistent style, there was nothng there that stood out and stole your attention. Except the crystals of course but those were the items you wanted to draw attention to. The low resolution simplified graphics actually helped a lot there because it made it easier to integrate whatever wacky avatars players and sabouteurs showed up with.
The Linden Realms music stream helps a lot too. It's actually brilliant, carefully designed to set a mood and emphasize rather than draw attention away from the visual scene and the action.
Of course, it also has something as rare in SL as speed. That always makes immersion so much easier, there's no time for your mind to wander.

Basic principles for good content creation

Basic principles for good content creation


Some (well, only one for now) more "philosophical" articles about the general principles for good content.

Index

Index

What's in this blog (so far):

Thursday, 14 February 2019

Texture scaling

Texture scaling


Inspired by a post at Beq Janus' blog.

Second Life and the Hypergrid only support a few texture sizes and if you want good performance, you want to keep them as small as possible. That means they usually have to be resized to work and the rule is:
Scale your textures before you upload them!!!
Why?

Because there are different ways to scale an image and which is the best depends on a lot of factors. Often when people complain about poor resolution it's actually the scaling algorithm, not the pixel count that is the problem.

The texture uploader uses bilinear scaling. That is actually a good choice when you don't have a choice. But if you let your image editor do the job, you do have a choice and that is always better. It also means you get to see the result before you upload so you don't get nasty surprises afterwards.

The alogrithm I've found to be the best most of the time is neither bicubic or straight bilinear but Fant - a variant of bilinear you won't get from the uploader but as I said, there are exceptions.

For all the nerdy under-the-hood details, check out the wikipedia article about image scaling.

A special tip:
Sometimes a little bit of blurring (usually before scaling) can actually improve the perceived resolution. You can do this with Gaussian blur or by saving the image in the lossy jpeg format. Yes, I know this seems counter-intuitive but it does make sense. Quite often it's the graininess caused by high contrast neighbour pictures that is the problem, not the resolution. Blurring smooths out the texture and that can often help. Not always, but it's worth trying.

Textures

Textures

Tuesday, 12 February 2019

Bigger prims

Bigger prims

Here are some cool and useful Prim builder tricks.

Officially the maximum size for any object in Second Life is 64x64x64 m. On the Hypergrid and other opensim based grids, the limit is 256x256x256m.

There are "megaprims" in Second Life. These are old prims some content creators were able t create due to two old (and quickly fixed) bugs. The biggest of them is a whopping 65,536x65,536 m, big enough to cover 65,536 whole sims (In theory at least - they won't actually have any effect that far away from their root location).

But even without mega prims, there are ways to extend them beyond the official size. And in Second Life we also have the option to link two prims, force them over to the modern LI calculation and have them count as a single land impact combined.

I once posted a challenge in the Builders Brewery and later I reposted it on the official Second Life forum: How much land impact does it take to cover a whole sim completely with prims without using megaprims?

The obvious answer is 16 64x64 m prims but there are several ways to reduce it. I had four (or rather three-and-a-half) ways in my mind when I posted the challenge and two replies in the forum discussion came up with other solutions using scripts and - one of them - temporary objects.

I'll ignore the two scripted alternatives here since they're not really about prim handling (and also are quite heavy on the poor server). But my three-and-a-half answers are:


Solution 1: Slightly smaller linked prims (11 LI)

As I said, you can use modern LI calculation to make two linekd prims coutn as only 1 LI combined. Unfortunately you can't do that with side-by-side 64x64 m prims because of the 54 m limit to the distance between linekd objects.

But you can link them if you reduce their size along one axis a little bit. 54x64 m is enough althoguh I usually prefer slightly less (50x64 m). Ten such pairs plus a sngle prim is enough to cover an entire sim, bringing the land impact down to 11.


Solution 2: Top shear (8 LI)

Top shear is one of the prim twisting parameters and what it does is shift the top of the prims to one side, extending it up to 50% outside its nominal size.
Here are two such prims (colour coded for clarification), side by side and linked:

Between them these two prims cover as much ground as three unmodified prims and combined with Solution 1, they are still only 1 LI.

This way it is possible to reduce the total land impact for a full sim coverage to 8.


Solution 2 1/2: Double top shear (? LI)

You can top shear along both the x and y axis to cover even more ground with a single prim. The problem is that you end up with rather irregular shapes and will have to overlap and/or add smaller filler for a complete coverage. Don't ask me how low you can get the LI this way. Thinking about it makes my head spin.


Solution 3: Reverse taper (4 LI)

This is a bit special and needs a long explanation.

 Prims are "procedural" (aka "algorithmic") objects, that is the viewer is fed some basic parameters and generates the right shape according to those. As far as I can figure out, there are 14 bytes of parameters - give or take one or two, depending on exactly how the LL programmers thought at that time. That means there are 5,192,296,858,534,830,000,000,000,000,000,000 possible prim shapes. The software converting the prims to viewable mesh can generate all those shapes with no problems and none of them are harder or easier for it to handle than the others.

Most of those shapes are not available through the regular builder pallette or lsl though. They have been left out, some for obviously good reasons, others for more questionable ones. But after the viewer code was released as open source, somebody decided to take a closer look at this and added some extra functions to the builder palette giving us access to a few (but not nearly all) of those "secret"  prim shapes. These functions are still included in many third party viewers.

The parameter we want to look at in this particular case, is taper. Of course, tapering a prim normally means less surface area at one end of the path, not more. But it is actually possible to "reverse taper" it like this:


This prim is nominally 0.5x0.5x0.5 m but with "reverse tapering" the top surface is 1x1 m. Scale it up to max size and we get 128x128 m on the top, enough to cover a quarter of a sim. This is a legacy prim so the nominal land impact is 1. The actual LI can be a bit higher because of the physics weight but that's easily corrected by setting it to convex hull.

Prims (Primitives)

Index: Assets: Prims (Primitives)

Prims (Primitives)

Related articles:

Prims - or primitives as their full name is - are the original builders' materials of Second Life. Prims are "procedural objects", that is, they are generated by the viewer according to a fairly small set of parameters. You can think of prims as Minecraft on steroids or a simple version ao Archimatix if you like.

The advantage of prims over mesh is that they require far less data than mesh. This is essential for streamed virtual realities where bandwidth always is a major limiting factor and I think we ought to use them as much as possible and far more than what is common today.

Another big advantage prims have, is that you can create them and build with them in-world. Not only is that more fun (at least I think so) it also means it's easier to adapt your build to the surroundings and make adjustments later.

The prim system was developed by Avi Bar-Zeev 2002-2003. A few years later Bar-Zeev tried to write an article explaining how it all works but he seems to have given up because there har been so many changes to it after he left Linden Lab. Even so, the first version of his article is still well worth reading for those who want to understand that goes on under the hood in Second Life and on the Hypergrid. I have some plans to pick up where Bar-Zeev left and expand on his explanation. I'm not sure if I'll ever manage to find the time but stay tuned!

Body shape

Index: Assets: Avatar components:Body shape

Body shape


A fairly random list of tips how to make a good body shape. Originally posted by me on the official Second Life forum, with corrections and additions by me, Geena Davies, AyelaNewLifem, janetosilio, Rhonda Huntress and Alyona Su

  • General
    • Your basic looks is a combination of shape and skin and different skins may require very different shape settings.
    • Keep tweaking. Even if your shape looks good at first glance, you'll probably notice annoying details after a while. And don't forget to take backup copies!
    • Start with the body. It's easier to do than the head.
    • The sliders are not in any way balanced. Do not even think of starting with everything set at 50. If you don't believe me, read this (if you dare).
  • Height
    • Average RL human height varies a lot between different nations. Wikipedia has a table here: https://en.wikipedia.org/wiki/List_of_average_human_height_worldwide. You probably want to go a bit taller in SL since everything else tend to be scaled up.
    • The height readout you get in the standard viewer's edit window is way off. Firestorm's reading is fairly close to the avatar's actual height inworld.
    • The sliders that affect overall height the most are are: Height (obviously) and Leg Length
    • Head size, Neck Length and Hip Length  will also affect overall height but not very much.
    • Torso Length does not affect overall height significantly. It only adjust the ratio betwen torso and leg length.
      Special for people not familar with metrics (that is 'mericans): https://www.rapidtables.com/convert/length/feet-to-cm.html
  • Mesh bodies and heads
    • Mesh bodies and mesh heads alter the proportions significantly, different brands and models in dfferent ways. So if you use mesh body parts, you have to adjust shape to match.
    • Mesh heads increase the size of the head so if you use one, you need to adjust accordingly.
      All common mesh head models from the well known brands have a very prominent "duck bill" mouth. It's not possible to get a really realistic look with one of those but you can minimize the effect by reducing Lip Fullness and Lip Thickness.
  • Ears
    •  Size and position: If the top of the ears align roughly with the eyebrows and the bottom roughly with the space between mouth and nose, you shouldn't be too far off. Except, that's not actually possible. The SL/opensim avatar has ears palced very low on their head and it's not adjustable.
  • Eyes
    • For realism, keep eye size below 50 but not that much. Around 35 may be a good starting point.
  • Mouth
    • Keep the Lip Width low. At 40 you are already in Julia Roberts territory. (She has a lovely mouth actually but you really don't want to go much wider and most people have considerably narrower mouth than she has.)
    • Lip Ratio should probably be kept below 50. A realistic ratio is usually somewhere between 35 and 40, depending on your skin and the Lip Fullness and Lip Thickness settings.
    • Mouth Corner: From 60 and upwards you start to get a clown grin. From about 49 and downwards you start to get the dour face that was so popular in SL for a while (and may still be). Stay somewhere between for a realistic looking mouth.
  • Arms
    • Arm size just long enough you can reach your crotch when standing straight. Maybe a little bit longer but not much and certainly not shorter.
    • 80 is probably a good starting point for Arm Length.
    • For a female avatar you probably want crossed arms right underneath your berasts, if only to avoid problems with animations crossing them insde your breasts.
  • Hands and feet
    •  Keep the hand and foot sizes low. For modern female avatar that nearly always mean set those two sliders to 0. For male and old fashioned giantess avatars you may want it a little bit higher, but not much.
  • Shoulders
    • Typicall shoulders should be about twice as wide as the head for a female and 2 1/2 times as wide for a male.
    • If you want a realistic look, your shoulders also need to be broad enough so your arms hang naturally outside your hips. (And yes, this is true even for the most pear shaped female avis!)
  • Torso
    • Actual torso length depends both on the Torso Length and the Hip Length sliders. Balance those to get your belly button in a sensible place. This may depend on which skin you use.
    • Asians tend to have relatively long torsos relative to their leg length, Africans relatively short. The difference is ratehr subtle though.
  • Breasts
    • For female avatars (of course): Large Breast Size+Low Breast Buoyancy=Silicone Implants
  • Hip width
    • Adjust Leg Muscles for good looking legs, then Hip Width to get your legs together (without overlapping) and finally Saddle Bags to change the actual hip width.

Monday, 11 February 2019

Assets

Index: Assets

Assets


Assets are... everything really. That is, everything a grid based virtual world is made from. There are lots of different asset classes, some we can't do anything about as users/creators, others we can. Some of the classes are (I'll fill this list up as and when I have something to post about a class):

About Chin Rey and this blog

About Chin Rey and this blog


No, Chin Rey is not my real name and it's not even my regular handle in virtual reality. The names I usually use there are either Tess or Lynx, sometimes Bel, Jazz or Storm.

But ChinRey was the minor role play account I happened to be logged on to Second Life with when I stumbled across a content creator who got me hooked on building. Since then it's been the name I'm best known as. I prefer to be called Rey, don't mind Chin too much and have learned the lesson not to pick a joke name even for the most minor alt account.

My speciality is ultra-efficient landscape items (especially plants and houses) but I also make other items and I'm a skilled texture creator and a decent scripter (using my Bel account for scripts).

Most of my works are still stoved away in my inventory where nobody ever see it but some are for sale for Second Life at:
https://marketplace.secondlife.com/stores/167633 (full perm parts for other builders)
and

I also have a small store in a sim named Snake Isolator on a lovely little independent grid called TAG and I'm also slowly uploading content to a store on the Kitely Grid. My brand names are OPQ, Chin Rey Houses and Bel's Scripts.

This blog is a place to store info about content creation for grid based virtual realities, succh as Second Life and the Hypergrid. It may eventually end up as a complete manual for content creators but for not it's just a bunch of isolated (but still useful) articles.