Thursday, 14 January 2021

Creating LoD models, case study 2, Lesson 1

Tutorials: Creating LoD models, case study 2, part 1

Creating LoD models

Case study 2: Wall sign, Introduction and Lesson 1

Originally posted at the official Second Life Forum. Unfortunately the pictures got lost when Linden Labmoved the forum to another host and without them, the tutorial is rather useless. So I'm reposting it here with a few minor updates.

Introduction

This is the sign outside my Queen of Spades pub in Keswick:


It seems quite simple at first glance but it has details like miter joints for the base plate:


and most significantly a rather elaborate attachment using six toruses and six twisted tubes:


The Queen of Spades is currently used as part of the Silent Slasher game but mostly it's just a decoration in the landscape and I never bothered to do much about it. Especially not the sign because I'm really happy with how it looks and don't see any need to change it. But it was all prims and that meant 10 LI, a bit too much for a simple sign really. Eventually I decided to do some serious work on a mesh version.

Almost straight out of Mesh Studio with just a little bit of cleaning in a Blender, it's 3694 vertices and 7358 triangles. Sounds a little bit heavy to me:


Lesson 1: UV mapping

I may be wrong but I understand that the common way to UV map an SL mesh today is to use few faces and "islands" for each part on the UV map. In this case you'd probably use three faces, one for the signboard itself, one for the wooden base plate and one for all the metal parts.

If you're lazy, you'd just use the basic automatic UV mapper in Blender and end up with this:


Now, this is of course a very poor UV map, you waste more than half the pixels in the texture, the toruses are visibly distorted and so on. Contrary to what many builders seem to believe, Blender does a very poor UV mapping job so be prepared to spend a lot of time cleaning this up before you get any kind of decent result. But how many people realize that a UV map like this also affects the land impact?

If I try to upload this, using the default automatic LoD settings I get:


16.409 LI.

Here's a different way. If I split the metal parts into five separate faces:


I can get a much cleaner UV mapping:


Much cleaner and much less work, most of the parts I didn't UV map at all, I just scaled the mapping from the prim original. The map still looks a bit wasteful of texture pixels but it isn't. The vertical and the different horizontal segments are different faces and will end up using all the pixels of the texture.

The LI?
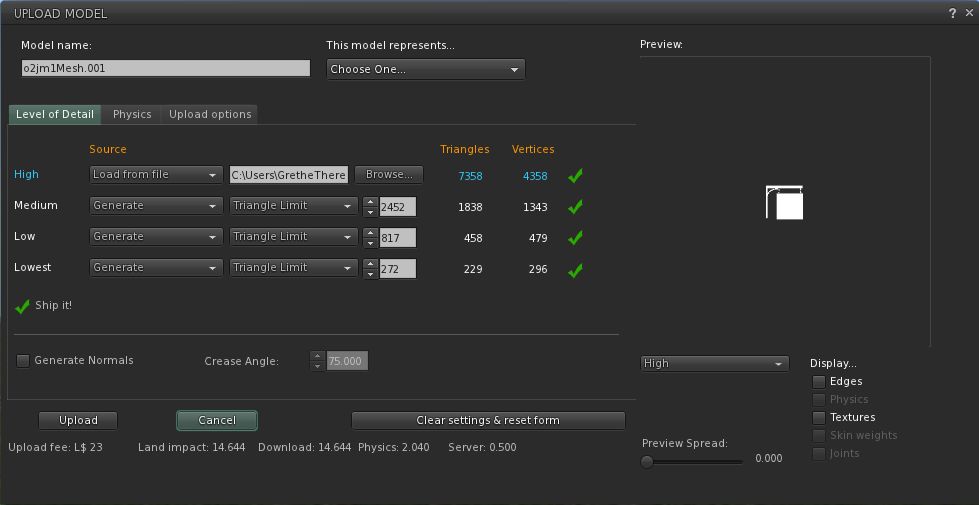

14.644. Still too high but 10 percent reduction by saving a lot of time and effort on the UV map? Yes, please!

I've heard so many times that simple texture maps and repeating textures are outdated and the only right thing to do is to use "proper" UV maps and baked textures. It's the Emperor's new Texturing. I don't know of any skilled mesh maker in SL or anywhere else who thinks that way. Quite the contrary: use simple UV maps and repeating textures wherever possible, complex UV maps and baked textures only where they really make a difference.

Lesson 2 - Hidden faces

Thursday, 3 September 2020

Second Life Mesh Physics 101


(Originally posted on the official Second Life forum)

Physics in a virtual world has two purposes, it defines where avatars (and objects set to be physical) can and can't move and it provides surfaces for "ray tracing" (a feature that defines which spots you can rez on and is also used for pathfinding and a few other things).

Physics engines work with two very different kinds of physical objects, surfaces and hulls. (There's a third one too, height fields but it's only used for the system ground so it isn't relevant here). HAVOK, the physics engine used by Second Life, operates with five different hulls and two different surfaces but only the two surfaces and one of the hulls are available for meshes.

When we analyze the physics, the uploader will try to convert the physics mesh we feed it into one or more hulls, if we don't analyze, it will use the input as it is and treat it as a surface. The physics engine, including the uploader's analyze function, is not LL's own, HAVOK is an Irish software copmany currently owned by Microsoft. This means there's not much LL can do about it, they have to use it as it is.

Both surface and hull physics have their pros and cons:


Hulls

A hull can be compared to ban lines in that they defines an "exclusion zone" you are not allowed to be inside.

The pros are:

  • They are always totally solid, if you are inside it, you will always be pushed out.
  • The physics weight is constant. If the hulls are all simple cubes, each of them will always add 0.360 to the physics weight. More complex hull shapes may add a bit more but it's still constant.

The cons:

  • The physics engine won't allow two hulls to touch each other, it will always leave a little bit of space between them. The uploader tries to compensate for this by shrinking the physics shape slightly but this is not a precise science so you will always hover a little bit above a mesh surface made with hulls.
  • There is no way to reduce the physics weight below the 0.360 per hull limit and the hull shapes are always farly simple. If an objects needs a complex physics shape, it'll have to be made from a lot of hulls.
  • Since a hull isn't defined by its surface and ray tracing is all based on surfaces, it can sometimes cause problems with rezzing and for pathfinding characters.

Surfaces

As I said, we have two different kinds of them:

Triangle

A single triangle has a constant physics weight of 0.200, making it the lightest of the shapes available for mesh (three of the special hulls we can't use are even lighter). It doesn't give us any useable physics of course but can still be handy for objects that can be phantom anyway.

Triangle list

Triangle list is just another name for a mesh, a surface made from several triangles streched between vertices. It is said to be heavier on the server than hull physics but that is a truth with modifcations. We often need multiple hulls or a very complex single hull to get a good physics model and in those cases triangle lists are usually considerably lighter.

One peculiar quirk HAVOK has, is that it doesn't handle triangle lists with small or very long and narrow triangles very well, the bigger the triangles are, the better. If the object size is smaller than 0.5 m on any axis, HAVOK simply gives up and handles it as a single convex hull and depending on other factros, you can get very high physics weight long before you reach that limit.

Pros:

  • Allows for very precise physics shapes
  • No ray tracing issues

Cons:

  • May cause inflated physics weight for very thin objects
  • Does not work at all with objects smaller than the 0.5 m limit
  • Is single sided so you may be able to penetrate it (with a little bit of difficulty) if you walk into it from the back side
  • If you move very fast, you may end up penetrating the surface before the physics engine has time to react. This is not a problem with normal avatar walking/running/flying speeds (unless there is a server glitch) but if you drop onto the surface from a high altitude or crash into it in a fast moving vehicle you can sometimes go right through it.

Four special points worth mentioning

For a physics model is made from a single 12 tri cube it doesn't seem to matter whether it's analyzed or not. The physics weight is always 0.360 and it doesn't seem to suffer from any of the quirks neither of the hull or surface physics. This may be because it corresponds exactly with the object's bounding box.

The bounding box is a cube surrounding the entire object. The physics engine can't keep track of the relations between every single object and avatar in a region of course so it uses the bounding boxes as a preliminary check to see if two objects are so enough to each other it'll have to do a more precise calculation.

For those who wonder, the "convex hull" option in the edit window uses HAVOK's analyzer to generate a single hull for the entire object. The physics weight depends on how complex that hull is but usually it's lower than the more detailed "prim physics".

Practically all parcels in Second Life are configured with no pushing. This means worn items are always phantom so there is no point in using elaborate physics models for clothes, hair, jewelry etc. Just upload with a single triangle as physics.

Monday, 30 March 2020

Brick walls


Brick walls

Brick sizes

Brick sizes vary depending on location and age of course but not nearly as much as we may think. The measurements here are for modern standard Norwegian bricks but they're not far off for other styles and nations:

RL 133% 150% 200%
Whole bricks per meter horizontally 5 3.75 3.33 2.5
Layers per meter vertically 14-15 10-11 9-10 7-7.5

Cement bricks

Cement bricks are generally about twice the size of redbricks:

RL 133% 150% 200%
Whole bricks per meter horizontally 2.5 1.9 1.6 1.25
Layers per meter vertically 5 3.75 3.3 2.5


Bonds

The bond is the pattern of the bricks in a wall. Let's establish some terminology first:
  • Stretcher: The regular brick with its long side facing outwards
  • Header: A brick with its short side facing outwards
  • Soldier: A brick standing vertically
  • Joint: Well, obviously - the horizontal or vertical mortar filled space between the bricks
  • Single thickness wall: A wall as thick as the header side of a brick
  • Double thickness wall: A wall as thick as the stretcher side of a brick
If we want a solid brick wall, we want it double thickness and without consecutive aligned vertical joints (don't worry, it'll all come clear when you look at the pictures). For simpler walls that don't have to carry much load, there are other options too.

Solid brick wall patterns

There are lots of different bonds used for solid, double thickness walls. Here are the most common - and two slightly unusual - ones:

 Common bond


Every sixth layer is made from headers, the rest from staggered stretchers.

English bond


Alternating stretcher and header layers. This is regarded as the strongest of the regular bonds.

Flemish bond


Each layer made from alternating stretchers and headers.

Garden bond


A pattern of two stretchers and one header in each layer.

Flemish/Common mix


I'm not sure if this has a special name, usually I've seen it referred to as "common bond". It's similar to the regualr common bond but with every sixth layer made in the Flemish alternating stretcher and header style rather than from ehaders only.

"Scandinavian garden bond"


Another bond I don't know a name for. I've only seen it twice, once in Norway and once in Denmark, so I decided to call it "Scandinavian garden". It's the same as the regular garden bond with two stretchers and one header in each layer but the layers are shifted relatively to each other (seemingly at random) so the headers aren't aligned vertially with each other.

Not so solid bonds

Stretcher bond (aka Running bond)


Stretchers only, each layer shifted a quarter, third or (usually) half brick width to avoid aligned vertical joints. This is what you'll usually see on a single thickness wall but it's not really recommended for load breaign double thickness ones.

Stack bond


Stretchers stacked nicely on top of each other. Sometimes used as decorative coverage on walls and embankments made from other materials but it is a very weak wall and you don't want to use it on its own.

Soldier crown


A layer of soldiers added to the wall, usually at the very top where it doesn't affect the structural strength very much. The illustration shows it on top of a stretcher bond wall but it can be added to any bond.

Sunday, 3 November 2019

Castle battlement dimensions

Index: Common measurements: Castle battlement dimensions

Castle battlement dimensions

Some terminology first:
  • Parapet: The battlement wall.
  • Crenels: The nothces in the parapet offering firing positions for the defenders.
  • Merlons: The blocks between the crenels, protecting the defenders from incoming fire.

RL 133% 150% 200%
Crenel width
Min. 0.6 0.8 0.9 1.2
Max 0.9 1.2 1.4 1.8
Merlon width
Min. 1.2 1.6 1.8 2.4
Max. 1.5 2 2.3 3
Merlon height
Min. 0.9 1.2 1.4 1.8
Max. 2.1 2.8 3.2 4.2

Source

designingbuildings.co.uk

Tuesday, 29 October 2019

Common tin can sizes

Common tin can sizes

All measurements are in cm.

Metric


Diam Height Typical use
250 ml ? ?
300 ml 8.5 5.5 Corn, Mushrooms (mini boxes)
500 ml 7.5 11 Tomatos, Beans
750 ml ? ?
900 ml 10 12 Stew, , Soups, Meat balls
1 l ? ?

U.S.


Diam Height Typical use
6Z 5.48.9
8Z Short 6.87.6
8Z Tall 6.88.3
No. I (Picnic) 6.810.2
No. 211 Cylinder 6.812.4
No. 300 7.611.3Cranberry Sauce. Pork & Beans
No. 300 Cylinder 7.614.1
No. I Tall 7.811.9
No. 303 8.111.1Fruits. Vegetables. Soups
No. 303 Cylinder 7.614.1
No. 2 Vacuum 8.78.6
No. 2 8.711.6Juices. Soups. Vegetables
Jumbo 8.7314.3
No. 2 Cylinder 8.713.7
No. 1.25 10.36
No. 2.5 10.311.9Fruits. Vegetables
No. 3 Vacuum 10.88.7
No. 3 Cylinder 10.817.8
No. 5 10.514.3Fruit Juice. Soups
No. 10 15.717.8Fruits. Vegetables

Sources

  • Metric dimensions: My own measurements (more info needed here)
  • U.S. dimensions: Wikipedia

Common container sizes

Index: Common measurement: Common container sizes

Common container sizes

Wednesday, 25 September 2019

AO animation settings

Index: Assets: Animations

AO animation settings


Recommended settings for AO animations:

Type Priority Looped Duration Comments
AO Run 3 y 20 sec
AO Walk 3 y 20 sec
AO Stand 1 or 2 y 20 sec
AO Left turn 3 or 4 y
Priority is messed up here. To fully override the default, it must be a 4. You can use a 3, but there will be issues.
AO Right turn 3 or 4 y
Priority is messed up here. To fully override the default, it must be a 4. You can use a 3, but there will be issues.
AO Crouch 3 or 4 Depends

AO Crouchwalk 3 y

AO Prejump 3 or 4 n 1-2 sec
AO Jump 3 or 4 Depends generally 2-3 sec
AO Landing 3 or 4 y generally 2 sec
AO Hard Landing 3 or 4 n generally 3 sec
AO Stand up 3 or 4 n

AO Fly Up 3 or 4 y

AO Fly Left turn 3 or 4 y

AO Fly Right turn 3 or 4 y

AO Fly 3 or 4 y

AO Fly Slow 3 or 4 y

AO Fly Down 3 or 4 y

AO Falling 3 or 4 y

AO Sitting 3 y

AO Sitgrounds 3 y

AO Swimming 3 y

AO Swim up 3 y

AO Swim down 3 y

AO Swim Left turn y


AO Swim Right turns 3 y

AO Typing 3 y

AO Away 3 y

AO Busy 3 y


Sources